
 像素鱼丸
像素鱼丸
本文方法已经失效
macOS自带的PHP没有freetype扩展,需要自己安装。
之前使用 https://php-osx.liip.ch/#install 安装PHP。 现在系统升级到 macOS Mojave后。
提示:
[WARNING]
Detected macOS Mojave 10.14. There are serious issues with it, due to the original apache not loading
foreign libraries anymore. PHP within apache will most certainly not work anymore if you proceed!
The cli version still will.
See this issue at https://github.com/liip/php-osx/issues/249 for details and discussion
解决办法是放弃使用自带apache,使用homebrew安装一个新的apache
安装 Homebrew,打开终端,输入以下命令:
ruby -e "$(curl -fsSL https://raw.githubusercontent.com/Homebrew/install/master/install)"
Works fine with homebrew installed apache
Steps to make it work, macOS comes with pre-installed apache, following are the commands to stop it and prevent from autostart on boot:
$ sudo apachectl stop
$ sudo launchctl unload /System/Library/LaunchDaemons/org.apache.httpd.plist 2>/dev/null
Install apache through homebrew
$ brew install httpd
Check apache installation through the following command and the output should be /usr/local/bin/apachectl
$ which apachectl
Start apache through the following command
$ sudo apachectl -k start
Set apache to startup on bootload
$ sudo brew services start httpd
Re-install php from https://php-osx.liip.ch link.
添加PHP到命令行
在~/.bash_profile 中添加
PATH="/usr/local/php5-7.2.9-20180821-074958/bin:$PATH"
命令行卡顿问题
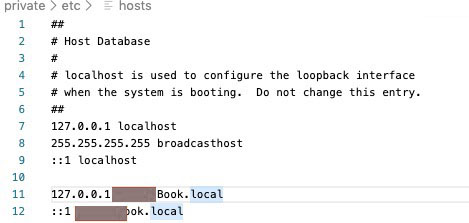
用这种方法安装PHP以后,php命令行速度很慢。php -v 都要很久,原因是尝试执行DNS查找本地计算机的主机名的原因。解决办法是修改 host 文件。

备注:
1,安装完成以后,Apache 和 PHP 的路径分别如下:
Apache 配置文件路径:/usr/local/etc/httpd
PHP 安装路径:/usr/local/php5
PHP.ini 路径:/usr/local/php5/lib/php.ini
PHP 更多配置文件在 /usr/local/php5/php.d
2,PHP XDebug 的配置文件路径是 /usr/local/php5/php.d/50-extension-xdebug.ini
在这里的优先级比较高,这里的
xdebug.remote_autostart=off
xdebug.remote_host=localhost
要改成:
xdebug.remote_autostart=on
xdebug.remote_host=127.0.0.1
另外一种方法,本方法感觉很有道理,没有亲测,不知道这种方法安装的 PHP 中是否带有 freetype 扩展。
安装apache php mysql 因为apache和php不在默认的仓库里,所以我们要先添加其所在的仓库。
brew tap homebrew/apache
brew tap homebrew/php
之后就是正常的安装了,安装过程homebrew会为你自行处理各种依赖。
brew install httpd24
brew install php
如果使用nginx 需要设置 php-fpm 开机启动
找到php-fpm的位置,在目录 /Library/LaunchAgents 下,创建文件 org.php.php-fpm.plist :
<?xml version="1.0" encoding="UTF-8"?>
<!DOCTYPE plist PUBLIC "-//Apple//DTD PLIST 1.0//EN" "http://www.apple.com/DTDs/PropertyList-1.0.dtd">
<plist version="1.0">
    <dict>
      <key>Label</key>
      <string>php-fpm</string>
      <key>Program</key>
      <string>/usr/local/php5/sbin/php-fpm</string>
      <key>KeepAlive</key>
      <true/>
    </dict>
</plist>
修改 ../etc/php-fpm.conf 的daemonize = yes。
执行:
sudo chown root:owner /Library/LaunchAgents/org.php.php-fpm.plist
sudo chmod +x /Library/LaunchAgents/org.php.php-fpm.plist
launchctl load -w /Library/LaunchAgents/org.php.php-fpm.plist
我把文件放在 /Library/LaunchDaemons 开机启动失败,放到 /Library/LaunchAgents 才启动成功。
LaunchDaemons是用户未登陆前就启动的服务(守护进程)。
LaunchAgents是用户登陆后启动的服务(守护进程)。
参考:
https://github.com/liip/php-osx/issues/249
https://blog.csdn.net/weixin_33851604/article/details/89653077
修改时间 2024-08-25